


6ピストン鍛造キャリパー
段差付き6ピストン鍛造キャリパー(30 / 34 / 38mmピストン)による均一なパッド荷重
メール:sales@ttsport-racing.com
Currency
 AED
AED
 AFN
AFN
 ALL
ALL
 AMD
AMD
 ANG
ANG
 AUD
AUD
 AWG
AWG
 AZN
AZN
 BAM
BAM
 BBD
BBD
 BDT
BDT
 BIF
BIF
 BND
BND
 BOB
BOB
 BSD
BSD
 BWP
BWP
 BZD
BZD
 CAD
CAD
 CDF
CDF
 CHF
CHF
 CNY
CNY
 CRC
CRC
 CVE
CVE
 CZK
CZK
 DJF
DJF
 DKK
DKK
 DOP
DOP
 DZD
DZD
 EGP
EGP
 ETB
ETB
 EUR
EUR
 FJD
FJD
 FKP
FKP
 GBP
GBP
 GMD
GMD
 GNF
GNF
 GTQ
GTQ
 GYD
GYD
 HKD
HKD
 HNL
HNL
 HUF
HUF
 IDR
IDR
 ILS
ILS
 INR
INR
 ISK
ISK
 JMD
JMD
 JPY
JPY
 KES
KES
 KGS
KGS
 KHR
KHR
 KMF
KMF
 KRW
KRW
 KYD
KYD
 KZT
KZT
 LAK
LAK
 LBP
LBP
 LKR
LKR
 MAD
MAD
 MDL
MDL
 MKD
MKD
 MMK
MMK
 MNT
MNT
 MOP
MOP
 MUR
MUR
 MVR
MVR
 MWK
MWK
 MYR
MYR
 NGN
NGN
 NIO
NIO
 NPR
NPR
 NZD
NZD
 PEN
PEN
 PGK
PGK
 PHP
PHP
 PKR
PKR
 PLN
PLN
 PYG
PYG
 QAR
QAR
 RON
RON
 RSD
RSD
 RWF
RWF
 SAR
SAR
 SBD
SBD
 SEK
SEK
 SGD
SGD
 SHP
SHP
 SLL
SLL
 STD
STD
 THB
THB
 TJS
TJS
 TOP
TOP
 TTD
TTD
 TWD
TWD
 TZS
TZS
 UAH
UAH
 UGX
UGX
 USD
USD
 UYU
UYU
 UZS
UZS
 VND
VND
 VUV
VUV
 WST
WST
 XAF
XAF
 XCD
XOF
XPF
XCD
XOF
XPF
 YER
YER
Evolution Series · フロントアクスル · プラットフォーム適合BBK
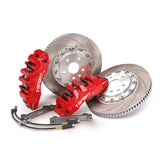
TTSPORT Evolution EB6は、より高い熱容量、よりしっかりとしたペダルフィードバック、そして工場のブレーキシステムよりも繰り返し性能の良い制動性能を求めるドライバーのために設計されたフロントアクスル用6ピストンビッグブレーキキットです。二ピース鍛造アルミキャリパー、段差付きピストン配置、36mmの二ピースローターが熱を制御し、ラップごと、ストップごとに予測可能な制御性を維持します。
重いスポーツセダン、SUV、チューニングプラットフォームの純正フロントブレーキは、パッド面積、ピストン数、ローターの質量が、シャーシのグリップ力に先行して不足しがちです。EB6はこれらすべてに同時に対応します:6ピストンによるより大きな締め付け力、より大きなパッド面積によるグリップ、そして熱を吸収・放散するための36mmの羽根深さを持つ380〜410mmのローターフェース。結果として、繰り返しの激しい停止時にもフェードしにくく、ペダルの感触が一定で直線的な制動を提供します。
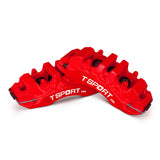
段差付き6ピストン鍛造キャリパー(30 / 34 / 38mmピストン)による均一なパッド荷重
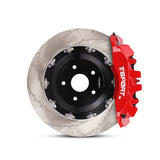
二ピース36mm厚のローター(直径380、390、410mm)
スチールまたはカーボンセラミック(CCB)ローターオプション
ステンレススチール製ブリーザブルラインでよりしっかりとした、安定したペダルフィール
EB6キャリパー本体はアルミニウムから二つに鍛造され、その後CNC仕上げされています。鍛造により合金の粒構造が密になり、高圧ライン下でもキャリパーのたわみを防ぎます。たわむキャリパーはペダルの遊びを増やし、グリップ感を鈍らせます。六つの二ピースで熱絶縁されたピストン(ダストブーツ付)はローターにパッドを押し付けます。段差のある直径(30mm先行、34mm中間、38mm後方)はパッドのテーパー補正を行い、均一な摩耗と最初のミリメートルからのしっかりとしたグリップを実現します。
総ピストン面積:キャリパーあたり55.0cm²。より大きなパッド面と高い締付力により、EB6は一般的な4ピストンキットよりもフロント軸で明らかにトルクが向上します。
ローターの質量は停止中にエネルギーを吸収します。EB6は二ピースの内部ベント付き36mm厚のローターを採用し、直径は380、390、410mmで、CNC加工されたアルミハットに取り付けられています。スチールローターは高炭素鋳鉄で熱処理されており、曲線スロット、粒子スロット、ウェーブスロット、またはドリル&スロットのフェースパターンがあります。カーボンセラミック(CCB)ローターは、最低の非ばね重量と最高の持続運転温度を求めるドライバー向けに提供されています。
ステンレススチールブレードラインは、各コーナーの純正ゴムホースに代わります。三層構造(PTFE内層、SUS304ステンレスブレード、PVC外シース)は、圧力下でのホースの膨張をほぼ排除し、ペダル操作の力をより多くクランプ力に変換します。ペダルは操作範囲の上部でより堅く感じられ、操作の線形性が向上し、閾値ブレーキング時のフィードバックも鋭くなります。
| ブレーキキャリパー | ||
|---|---|---|
| シリーズ | エボリューションシリーズ | |
| モデル | EB6 | |
| アクスル位置 | フロント | |
| ピストン数 | 6ピストン | |
| ピストンタイプ | 二ピースの熱絶縁タイプ、ダストブーツ付き | |
| ピストンダイヤー | 30 mm × 2 / 34 mm × 2 / 38 mm × 2 | |
| 総ピストン面積 | キャリパーあたり55.0cm² | |
| キャリパー寸法 | L 335 × W 160 × H 102 mm | |
| 構造 | 二ピース鍛造アルミニウム | |
| 正味重量 | キャリパーあたり4.6kg(パッドなし) | |
| 表面仕上げ | 高温グロスコーティング | |
| 推奨ホイールサイズ | 19インチ以上 | |
| 推奨ローターサイズ | Ø380–410 mm × 36 mm | |
| ブレーキローターの選択肢 | ||
| ローターオプション | スチール / 高炭素オプション | カーボンセラミックオプション |
| ローター素材 | スチール(高炭素) | カーボンセラミック(CCB) |
| 直径×厚さ | Ø380 / 390 / 410 × 36 mm | Ø380 / 390 / 410 × 36 mm |
| 構造 | 二ピース、内部通気 | 二ピース、内部通気 |
| 取り付け | 固定式またはフローティング(サイズ依存) | フローティング |
| ローターフェースパターン | カーブ / グレイン / ウェーブスロットまたはドリルド&スロット | クロスドリル |
| 方向性 | はい — 左右専用 | はい — 左右専用 |
| ブレーキパッドの選択肢 | ||
| パッドオプション | スチールローターパッド | カーボンセラミックパッド |
| 対応ローター素材 | スチール / 高炭素ローターのみ | カーボンセラミックローターのみ |
| 動作温度範囲 | 0–600 °C | 0–700 °C |
| 平均摩擦係数 | 平均μ:0.38 | 平均μ:0.45 |
| ライン | ||
| ブレーキライン構造 | 三層構造 | |
| ブレーキライン素材 | PTFEインナーレイヤー / SUS304ステンレスブレード / PVC保護外皮 | |
| ブレーキラインフィッティング | 車両特定、キャリパー側およびシャーシ側 | |
| ブラケット | ||
| ローター ハット | CNC加工高強度アルミニウム合金 | |
| キャリパーブラケット | CNC加工された炭素鋼、ラジアルマウント | |
| キャリパー取り付け | ラジアルマウント、車両専用ブラケット付属 | |
| 適合と取り付け | ||
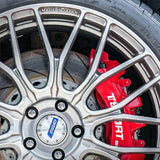
| 最小スポーククリアランス | 103 mm | |
| 推奨ホイールサイズ | 19インチ以上 | |
| ローター径の選択 | 380、390、または410mmで、用途やホイールクリアランスに応じて選択します。 | |
| ベッディングイン手順 | 積極的な使用前に必要 | |
各ローターオプションにはマッチングしたパッドが付属します。スチールローターパッドは0〜600°Cの動作範囲で、平均摩擦係数は0.38です。ハードなストリートやトラックデイに十分な強度があります。CCBパッドはカーボンセラミックディスク専用に調合されており、0〜700°Cの範囲で、平均μは0.45です。高温時のトルク向上に寄与します。摩擦係数は温度、ライン圧、ローターの状態により変動します。
2 × EB6鍛造6ピストンフロントキャリパー(左右)
両キャリパー用のマッチドブレーキパッドセット1組
2 × 2ピースフロントローター(スチールまたはCCB、選択可能)
2 × CNC炭素鋼キャリパーマウントブラケット
2 × CNCアルミニウムローターハット
2 × ステンレススチールブレードブレーキライン
取り付けハードウェアが含まれています。激しい使用前に適切なベッディング手順を行い、パッド素材をローター面に均一に転写し、摩擦を安定させる必要があります。
ホイールの適合性はお客様の責任です。確認のお手伝いはしますが、最終的なクリアランスはお客様の特定のホイールとスペーサーに対して確認してください。
EB6キャリパーには最低19インチのホイールが必要です。
EB6キャリパーには内部スポーククリアランスが少なくとも103mm必要です。
EB6はプラットフォーム適応型のビッグブレーキキットです。キャリパーブラケットとブレーキラインのフィッティングはお客様の車両に合わせて製造されます。購入時に年式、メーカー、モデル、トリム、現在のホイールセットを確認してください。適合確認の書面による証明が必要な場合は、最初にご連絡ください。
厚いスポークや深いコンケーブフェイスを持つ19インチの純正ホイールの多くはクリアできませんが、アフターマーケットの鍛造ホイールは通常クリアします。ご不明な場合は、ホイールの裏側の写真と希望のローター径を送付いただければ、クリアランスを確認します。
EB6には19インチ以上のホイールと少なくとも103 mmの内部スポーククリアランスが必要です。19インチの純正ホイールの一部はスポークの形状によりクリアできない場合がありますので、ご不明な場合はホイールのバレルの写真をお送りください。
大きなローターは熱容量とブレーキトルクを増加させますが、ホイールクリアランスが必要で回転質量も増えます。380 mmはほとんどの19インチホイールの安全な基準です。390 mmと410 mmは、頻繁に強いブレーキをかけるドライバーやトラック用途に適しています。
スチール高炭素ローターはハードなストリートやトラックデイに対応し、メンテナンスが容易でコストも低いです。CCBローターは未悬架重量を大きく削減し、より高温(0–700°C)に耐え、通常使用での耐久性も高いですが、価格は高めで専用のCCBパッドが必要です。
ブレーキパッドの後端は前端よりも強く噛む傾向があり、テーパー摩耗を引き起こします。30 / 34 / 38 mmの段差配置は、リーディングピストンにより多くの締め付け力をかけ、トレーリングピストンには少なくして、摩擦面全体に均一な圧力をかけて摩耗を均一にし、よりクリーンな操作性を実現します。
はい。鍛造キャリパーはたわみに抵抗し、大きなピストンはより多くの流体を動かして強い締め付けを可能にし、ステンレス製のブレーキラインはホースの膨張を防ぎます。ペダルは上部でよりしっかりとした感触になり、ストローク中もより直線的で、閾値ブレーキング時にはよりシャープなフィードバックを得られます。
はい。適切なベッディング手順は、パッド素材の均一な層をローター面に転写し、摩擦係数を安定させます。これを省略すると、不均一な堆積や振動、効きの低下を招きます。ベッディングの手順はキットに含まれています。
TTSPORTブレーキのスペシャリストに相談して適合性の確認、ローターサイズの選択、CCBとスチールの違いについてご案内します。または、実際の顧客の取り付け例を見てインスピレーションを得てください。
Brake Kits · Fitment · Installation · Care Guide
A brake kit is not just a pair of larger calipers. Calipers, rotors, pads, hoses, brackets, rotor hats, mounting hardware, brake fluid, wheel clearance, and bedding procedure all work together as one system.
This guide explains how to confirm the right TTSPORT brake kit before ordering, what to check before installation, and how to care for the system after installation.
Do not order a brake kit by vehicle name alone. The correct kit depends on the vehicle, axle position, wheel package, driving use, and brake system layout.
Brake kits are application-specific. A visually similar kit can still have the wrong rotor offset, bracket geometry, hose fitting, caliper position, or wheel clearance requirement.
Different TTSPORT brake kit series use different hardware layouts. Always confirm what the kit includes before purchase.
Use direct-mount calipers and one-piece rotors where specified. These kits do not use rotor hats or caliper brackets unless the final product page clearly states otherwise.
Use separate friction rings and rotor hats. Hat offset, ring bolt pattern, hardware style, and rotor direction must be matched correctly.
May require bespoke brackets, rotor hats, brake lines, and engineering confirmation based on knuckle, hub, wheel, and competition use.
Require extra attention to wheel clearance, tire size, vehicle load, descent control, hose routing, and dust / water exposure.
Do not assume every brake kit includes the same parts. Package contents vary by product series, vehicle application, and final order configuration.
Before finalizing the order, review the kit specification carefully. Confirm the brake kit is matched to your vehicle and wheel setup, not only to the model name.
If any part is not listed in the final order or product page, do not assume it is included.
Inspect every component before installation. Do not modify, grind, drill, stretch, force, or space brake kit components to make them fit.
Safety: Brake kits affect braking force, hydraulic sealing, heat control, wheel clearance, and vehicle stability. Do not install the kit if fitment, torque, direction, clearance, or compatibility is unclear.
Correct installation is as important as the brake kit itself. A properly engineered kit can still perform poorly if installed with dirty mounting faces, incorrect torque, poor hose routing, or trapped air in the hydraulic system.
Verify caliper centering over the rotor and confirm even pad sweep across the friction surface.
Confirm left / right rotor direction if the rotor uses directional vanes or directional face pattern.
Check brake hose length and routing at full steering lock and full suspension travel. No twisting, rubbing, stretching, or kinking.
Check caliper-to-spoke and caliper-to-barrel clearance before road use. Wheel diameter alone is not enough.
Use the correct brake fluid type and bleed the system until pedal feel is firm and consistent.
Torque all brake hardware to the specified value. Do not reuse damaged, unknown, stretched, or corroded safety-critical fasteners.
Brake pads and rotors need a controlled bedding process before full performance is available. Bedding helps create an even transfer layer on the rotor surface, improving bite, pedal consistency, and vibration resistance.
Street pads, race pads, iron rotors, two-piece rotors, and carbon ceramic rotors may require different bedding procedures. Use the procedure supplied with the specific kit.
After installation and bedding, give the system a short break-in period before aggressive use. Pedal feel, pad contact, dust output, and noise may continue to settle after the first drives.
Brake kits need regular inspection, especially after track use, off-road use, towing, mountain driving, winter salt exposure, or any brake service.
Inspect pads, rotors, fluid level, and hose condition during normal service intervals. Prioritize quiet operation, smooth pedal feel, and even wear.
Check pad thickness, rotor surface condition, and fluid condition more often. Long descents create sustained heat even without track use.
Inspect for mud, sand, stone impact, hose abrasion, dust boot damage, and caliper contamination after trail use.
Inspect pads, rotors, fluid, and hardware before and after every event. Track heat shortens service intervals.
Check rear brake temperature, hydraulic handbrake behavior, pad wear, rotor cracking, and hardware condition frequently.
Use only compatible pads and approved bedding procedures. Inspect rotor surface condition carefully and avoid incompatible friction materials.
Do not continue driving if the brake system shows any of the following symptoms. Inspect the system or contact a qualified brake technician before using the vehicle again.
Send your vehicle details, brake kit series, wheel specs, driving use, photos, and any symptoms you notice. TTSPORT will help confirm fitment, installation checks, and the correct care path for your brake kit.
購読ありがとうございます!
このメールアドレスは登録されました!