


長距離下り坂用の熱容量
適合するØ345 mm × 32 mmの通気式ローターとピストン面積79cm²が、グレードを重ねてもペダルフィールを維持します。
メール:sales@ttsport-racing.com
Currency
 AED
AED
 AFN
AFN
 ALL
ALL
 AMD
AMD
 ANG
ANG
 AUD
AUD
 AWG
AWG
 AZN
AZN
 BAM
BAM
 BBD
BBD
 BDT
BDT
 BIF
BIF
 BND
BND
 BOB
BOB
 BSD
BSD
 BWP
BWP
 BZD
BZD
 CAD
CAD
 CDF
CDF
 CHF
CHF
 CNY
CNY
 CRC
CRC
 CVE
CVE
 CZK
CZK
 DJF
DJF
 DKK
DKK
 DOP
DOP
 DZD
DZD
 EGP
EGP
 ETB
ETB
 EUR
EUR
 FJD
FJD
 FKP
FKP
 GBP
GBP
 GMD
GMD
 GNF
GNF
 GTQ
GTQ
 GYD
GYD
 HKD
HKD
 HNL
HNL
 HUF
HUF
 IDR
IDR
 ILS
ILS
 INR
INR
 ISK
ISK
 JMD
JMD
 JPY
JPY
 KES
KES
 KGS
KGS
 KHR
KHR
 KMF
KMF
 KRW
KRW
 KYD
KYD
 KZT
KZT
 LAK
LAK
 LBP
LBP
 LKR
LKR
 MAD
MAD
 MDL
MDL
 MKD
MKD
 MMK
MMK
 MNT
MNT
 MOP
MOP
 MUR
MUR
 MVR
MVR
 MWK
MWK
 MYR
MYR
 NGN
NGN
 NIO
NIO
 NPR
NPR
 NZD
NZD
 PEN
PEN
 PGK
PGK
 PHP
PHP
 PKR
PKR
 PLN
PLN
 PYG
PYG
 QAR
QAR
 RON
RON
 RSD
RSD
 RWF
RWF
 SAR
SAR
 SBD
SBD
 SEK
SEK
 SGD
SGD
 SHP
SHP
 SLL
SLL
 STD
STD
 THB
THB
 TJS
TJS
 TOP
TOP
 TTD
TTD
 TWD
TWD
 TZS
TZS
 UAH
UAH
 UGX
UGX
 USD
USD
 UYU
UYU
 UZS
UZS
 VND
VND
 VUV
VUV
 WST
WST
 XAF
XAF
 XCD
XOF
XPF
XCD
XOF
XPF
 YER
YER
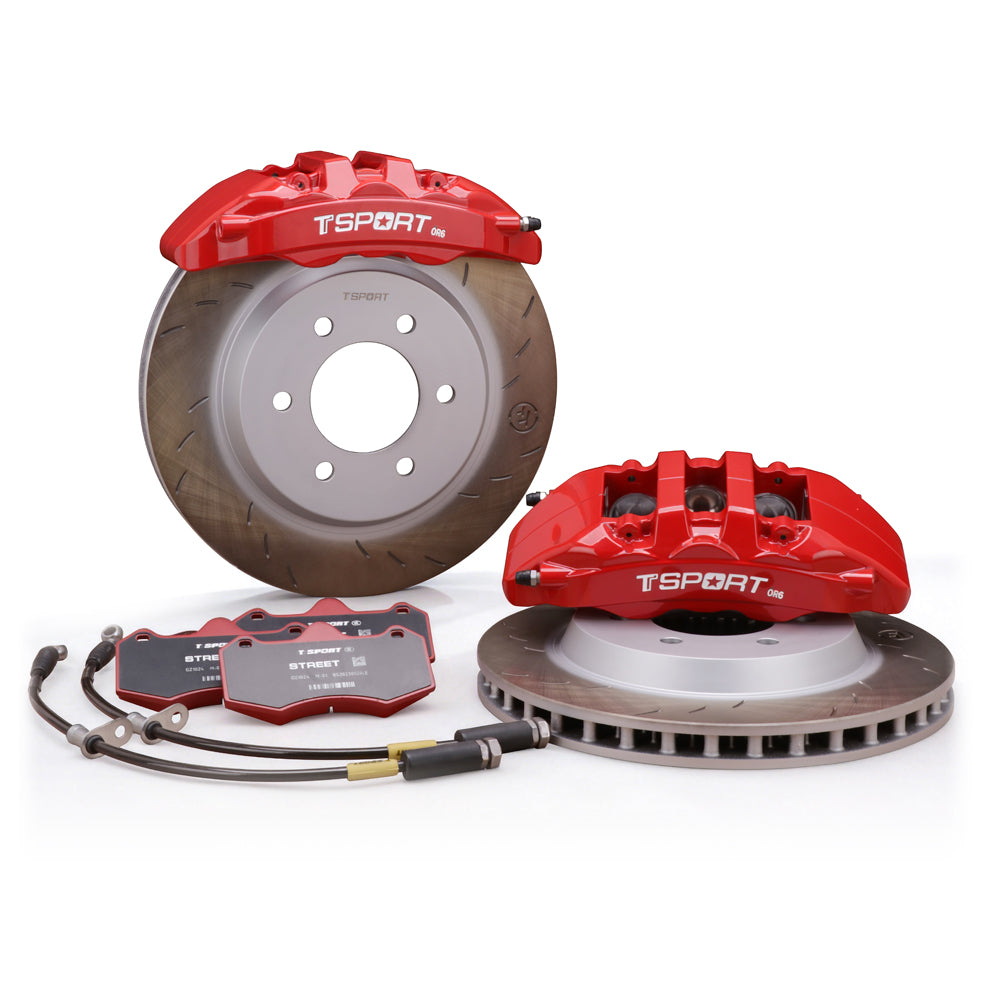
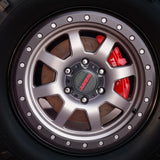
ダイレクトマウントシリーズ · フロントアクスル · オフロード6ピストン
TTSPORT OR6フロントビッグブレーキキットは、トヨタLC150プラドおよびレクサスGX400/GX460のオーナー向けに設計されており、重負荷に対応します。アーマー、ウインチ、引き出し、長距離燃料タンク、ルーフテント、大型タイヤ、トレーラー積載など、フロントブレーキにより多くの負荷がかかる状況—特に長い山岳下りや荒れたトレイルでは、熱管理とペダルの一貫性が結果を左右します。
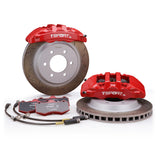
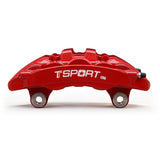
OR6は鍛造された6ピストンフロントキャリパーとØ345 mm × 32 mmの熱処理高炭素鋳鉄ローター、対応パッド、ステンレススチール製のブレードラインを組み合わせています。その結果、熱容量が向上し、ペダルがよりしっかりし、オーバーランドの重量下でも予測可能な制御性を実現します — トラック専用の激しいかみつきではなく、コントロールしやすい制動力です。
適合するØ345 mm × 32 mmの通気式ローターとピストン面積79cm²が、グレードを重ねてもペダルフィールを維持します。
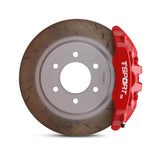
パッドの耐熱温度は0–600°C、平均μは0.38—洗面器状の岩や遅いテクニカルセクションでのコントロールに適しており、単一ラップのスプリントには向きません。
スチールバンパー、ウインチ、引き出し、燃料、水、リカバリーギア、大型タイヤを搭載するトラック向けに設計されています。
SUS304ステンレス製ブレードPTFEラインは、トラックが積載状態、熱い状態、下り坂作業時のホースの膨張を抑えます。
キャリパーは車両専用のフロントナックルジオメトリに直接取り付けられます — このOR6構成ではローターハットやキャリパーブラケットは使用しません。
トヨタランドクルーザープラド(LC150)、レクサスGX400、レクサスGX460は、Ø345 mm × 32 mmのフロントローター仕様を使用しています。
| ブレーキキャリパー | |
|---|---|
| シリーズ | ダイレクトマウントシリーズ |
| モデル / 適用範囲 | OR6 |
| アクスル位置 | フロント |
| ピストン数 | 6ピストン |
| ピストンタイプ | 一体型の熱絶縁ピストンとダストブーツ |
| ピストンダイヤー | 40 mm × 4 / 43 mm × 2 |
| キャリパー寸法 | L 301 mm × W 149 mm × H 130 mm |
| 総ピストン面積 | キャリパーあたり79cm²、すべてのピストンの合計 |
| 製造工程 | 二ピース鍛造アルミボディ |
| 正味重量 | 1キャリパーあたり4kg(パッド除く) |
| 表面仕上げ | 高温グロスコーティング |
| 推奨ホイールサイズ | 17インチ以上 |
| 推奨ローターサイズ | Ø340–355 mm × 32/34 mm |
| ブレーキローター | |
| ローター素材 | 熱処理高炭素鋳鉄 |
| アクスル位置 | フロント |
| この用途のローター寸法 | Ø345 mm × 32 mm |
| 構造 | 一体型ローター |
| 通気 | 内部通気 |
| ローター取り付け | 固定 |
| 方向性デザイン | はい — 左右専用 |
| ローターフェースパターン | ウェーブスロット |
| ブレーキパッド | |
| 対応ローター素材 | 鉄 / スチールローターのみ |
| 動作温度範囲 | 0–600 °C |
| 平均摩擦係数 | 平均μ:0.38;温度、ライン圧、ローター状態により変動 |
| ライン | |
| ブレーキライン構造 | 三層補強構造 |
| ブレーキライン素材 | PTFE内層 / SUS304ステンレススチールブレード / PVC保護外皮 |
| ブレーキラインフィッティング | 車両固有のフィッティング; キャリパー側とシャーシ側のフィッティングは適用により異なります |
| 車両適用範囲とローターマッピング | |
| 2009-2023年トヨタランドクルーザープラド(LC150) | 345 mm × 32 mm |
| 2012-2017年レクサスGX400 | 345 mm × 32 mm |
| 2010-2023年レクサスGX460 | 345 mm × 32 mm |
| 適合と取り付け | |
| 車両適合性 | 2009-2023年トヨタランドクルーザープラド(LC150) · 2012-2017年レクサスGX400 · 2010-2023年レクサスGX460 |
| モデルイヤー | トヨタランドクルーザープラドLC150:2009-2023年 · レクサスGX400:2012-2017年 · レクサスGX460:2010-2023年 |
| アクスル | フロント |
| キャリパーマウントタイプ | ダイレクトマウント |
| 最小ホイールサイズ | 17インチ以上 |
| 最小スポーククリアランス | 91 mm |
| ブレーキラインフィッティングタイプ | 車両固有のフィッティング; キャリパー側とシャーシ側のフィッティングは適用により異なります |
| ベッディングイン手順 | 必要 |
2009-2023年トヨタランドクルーザープラド(LC150)、2012-2017年レクサスGX400、2010-2023年レクサスGX460には、Ø345 mm × 32 mmの正しいOR6ローター仕様が適用されます。この用途には、旧型の335 / 345 / 355 mmのオプションレイアウトは使用しないでください。
左/右専用の鍛造6ピストンフロントキャリパー2セット。
フロントキャリパー用ブレーキパッド、0–600°C対応、鉄/鋼ローター用。
2つの一体型フロントローター、Ø345 mm × 32 mm、熱処理高炭素鋳鉄、内部ベント、左右専用。
ステンレススチール製ブレードブレーキライン2本(PTFEインナライナー、SUS304ブレード、PVC保護外皮、車両専用フィッティング付き)。
トヨタLC150プラド / レクサスGX400 / GX460用の車両専用ダイレクトマウントハードウェアを提供します。
ダイレクトマウントシリーズは一体型ローターとダイレクトマウントキャリパーを使用します。ローターハットとキャリパーブラケットは含まれておらず、このOR6適用では使用されません。
OR6は17インチ以上のホイールと少なくとも91mmのスポーククリアランスが必要です。ホイール径だけでは不十分で、スポーク形状、バレルプロファイル、オフセットも適合に影響します。
17インチ以上のホイールが必要です。
最小スポーククリアランス:91mm。注文前にスポーク形状、ホイールオフセット、インナーバレルのプロファイルを確認してください。
適用範囲:2009-2023年トヨタランドクルーザープラド(LC150)、2012-2017年レクサスGX400、2010-2023年レクサスGX460、フロントアクスル、Ø345 mm × 32 mmのローター仕様。
クリアランスに不安がある場合は、モデル年、トリム、ホイール仕様、用途を注文前に送信してください。
はい。このリストは、2009-2023年トヨタランドクルーザープラド(LC150)、2012-2017年レクサスGX400、2010-2023年レクサスGX460のフロントアクスルの6ピストンアップグレードをカバーしています。この用途に適したローター仕様はØ345 mm × 32 mmです。
2009-2023年トヨタランドクルーザープラド(LC150)、2012-2017年レクサスGX400、2010-2023年レクサスGX460は、OR6ダイレクトマウントシリーズのØ345 mm × 32 mmの一体型フロントローターを使用しています。この用途には、旧型の335 / 345 / 355 mmのオプションレイアウトは使用しないでください。
OR6は17インチ以上のホイールと最小スポーククリアランス91mmが必要です。ホイール径だけでは不十分で、スポークのプロファイル、オフセット、バレル形状も注文前に確認してください。
いいえ。これはダイレクトマウントシリーズのOR6適用で、一体型ローターとダイレクトマウントキャリパーを使用しています。ローターハットやキャリパーブラケットはこの構成には使用されません。
OR6は長距離下りや洗濯板状の路面、技術的な低速走行などの長時間負荷下でのコントロールに最適化されています。0〜600°Cのパッドと平均μ0.38を備えています。トラック用BBKは短距離の非常に高温の停止に対応し、引っかかりやすく操作が難しいと感じることがあります。
はい。各キットには、SUS304ステンレス製のブレードフロントライン2本、OR6パッド、ワンピースの方向性ローター、キャリパー、ダイレクトマウントハードウェアが含まれています。
はい。パッドとローターの表面に均一に素材を転写し、完全な摩擦を得るために適切なベッドイン手順が必要です。この工程を省略すると、不均一な堆積物、振動、制動力の低下を引き起こします。
フィッティングの確認や、LC150プラド / GX400 / GX460のビルドに対するOR6の互換性確認のサポートが必要ですか?
Brake Kits · Fitment · Installation · Care Guide
A brake kit is not just a pair of larger calipers. Calipers, rotors, pads, hoses, brackets, rotor hats, mounting hardware, brake fluid, wheel clearance, and bedding procedure all work together as one system.
This guide explains how to confirm the right TTSPORT brake kit before ordering, what to check before installation, and how to care for the system after installation.
Do not order a brake kit by vehicle name alone. The correct kit depends on the vehicle, axle position, wheel package, driving use, and brake system layout.
Brake kits are application-specific. A visually similar kit can still have the wrong rotor offset, bracket geometry, hose fitting, caliper position, or wheel clearance requirement.
Different TTSPORT brake kit series use different hardware layouts. Always confirm what the kit includes before purchase.
Use direct-mount calipers and one-piece rotors where specified. These kits do not use rotor hats or caliper brackets unless the final product page clearly states otherwise.
Use separate friction rings and rotor hats. Hat offset, ring bolt pattern, hardware style, and rotor direction must be matched correctly.
May require bespoke brackets, rotor hats, brake lines, and engineering confirmation based on knuckle, hub, wheel, and competition use.
Require extra attention to wheel clearance, tire size, vehicle load, descent control, hose routing, and dust / water exposure.
Do not assume every brake kit includes the same parts. Package contents vary by product series, vehicle application, and final order configuration.
Before finalizing the order, review the kit specification carefully. Confirm the brake kit is matched to your vehicle and wheel setup, not only to the model name.
If any part is not listed in the final order or product page, do not assume it is included.
Inspect every component before installation. Do not modify, grind, drill, stretch, force, or space brake kit components to make them fit.
Safety: Brake kits affect braking force, hydraulic sealing, heat control, wheel clearance, and vehicle stability. Do not install the kit if fitment, torque, direction, clearance, or compatibility is unclear.
Correct installation is as important as the brake kit itself. A properly engineered kit can still perform poorly if installed with dirty mounting faces, incorrect torque, poor hose routing, or trapped air in the hydraulic system.
Verify caliper centering over the rotor and confirm even pad sweep across the friction surface.
Confirm left / right rotor direction if the rotor uses directional vanes or directional face pattern.
Check brake hose length and routing at full steering lock and full suspension travel. No twisting, rubbing, stretching, or kinking.
Check caliper-to-spoke and caliper-to-barrel clearance before road use. Wheel diameter alone is not enough.
Use the correct brake fluid type and bleed the system until pedal feel is firm and consistent.
Torque all brake hardware to the specified value. Do not reuse damaged, unknown, stretched, or corroded safety-critical fasteners.
Brake pads and rotors need a controlled bedding process before full performance is available. Bedding helps create an even transfer layer on the rotor surface, improving bite, pedal consistency, and vibration resistance.
Street pads, race pads, iron rotors, two-piece rotors, and carbon ceramic rotors may require different bedding procedures. Use the procedure supplied with the specific kit.
After installation and bedding, give the system a short break-in period before aggressive use. Pedal feel, pad contact, dust output, and noise may continue to settle after the first drives.
Brake kits need regular inspection, especially after track use, off-road use, towing, mountain driving, winter salt exposure, or any brake service.
Inspect pads, rotors, fluid level, and hose condition during normal service intervals. Prioritize quiet operation, smooth pedal feel, and even wear.
Check pad thickness, rotor surface condition, and fluid condition more often. Long descents create sustained heat even without track use.
Inspect for mud, sand, stone impact, hose abrasion, dust boot damage, and caliper contamination after trail use.
Inspect pads, rotors, fluid, and hardware before and after every event. Track heat shortens service intervals.
Check rear brake temperature, hydraulic handbrake behavior, pad wear, rotor cracking, and hardware condition frequently.
Use only compatible pads and approved bedding procedures. Inspect rotor surface condition carefully and avoid incompatible friction materials.
Do not continue driving if the brake system shows any of the following symptoms. Inspect the system or contact a qualified brake technician before using the vehicle again.
Send your vehicle details, brake kit series, wheel specs, driving use, photos, and any symptoms you notice. TTSPORT will help confirm fitment, installation checks, and the correct care path for your brake kit.
購読ありがとうございます!
このメールアドレスは登録されました!