


โครงสร้าง 6 สูบแบบบาง
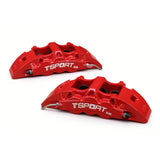
ตัวถังอะลูมิเนียมขึ้นรูปแบบสองชิ้นมีความกว้างเพียง 121.6 มม. และสูง 74.9 มม. ช่วยให้สามารถติดตั้งได้ในดีไซน์ล้อที่มีความแน่นหนา ซึ่งไม่สามารถรองรับคาลิปเปอร์แบบโมโนบล็อกที่ลึกกว่าได้
อีเมล: sales@ttsport-racing.com
สกุลเงิน
 AED
AED
 AFN
AFN
 ALL
ALL
 AMD
AMD
 ANG
ANG
 AUD
AUD
 AWG
AWG
 AZN
AZN
 BAM
BAM
 BBD
BBD
 BDT
BDT
 BIF
BIF
 BND
BND
 BOB
BOB
 BSD
BSD
 BWP
BWP
 BZD
BZD
 CAD
CAD
 CDF
CDF
 CHF
CHF
 CNY
CNY
 CRC
CRC
 CVE
CVE
 CZK
CZK
 DJF
DJF
 DKK
DKK
 DOP
DOP
 DZD
DZD
 EGP
EGP
 ETB
ETB
 EUR
EUR
 FJD
FJD
 FKP
FKP
 GBP
GBP
 GMD
GMD
 GNF
GNF
 GTQ
GTQ
 GYD
GYD
 HKD
HKD
 HNL
HNL
 HUF
HUF
 IDR
IDR
 ILS
ILS
 INR
INR
 ISK
ISK
 JMD
JMD
 JPY
JPY
 KES
KES
 KGS
KGS
 KHR
KHR
 KMF
KMF
 KRW
KRW
 KYD
KYD
 KZT
KZT
 LAK
LAK
 LBP
LBP
 LKR
LKR
 MAD
MAD
 MDL
MDL
 MKD
MKD
 MMK
MMK
 MNT
MNT
 MOP
MOP
 MUR
MUR
 MVR
MVR
 MWK
MWK
 MYR
MYR
 NGN
NGN
 NIO
NIO
 NPR
NPR
 NZD
NZD
 PEN
PEN
 PGK
PGK
 PHP
PHP
 PKR
PKR
 PLN
PLN
 PYG
PYG
 QAR
QAR
 RON
RON
 RSD
RSD
 RWF
RWF
 SAR
SAR
 SBD
SBD
 SEK
SEK
 SGD
SGD
 SHP
SHP
 SLL
SLL
 STD
STD
 THB
THB
 TJS
TJS
 TOP
TOP
 TTD
TTD
 TWD
TWD
 TZS
TZS
 UAH
UAH
 UGX
UGX
 USD
USD
 UYU
UYU
 UZS
UZS
 VND
VND
 VUV
VUV
 WST
WST
 XAF
XAF
 XCD
XOF
XPF
XCD
XOF
XPF
 YER
YER
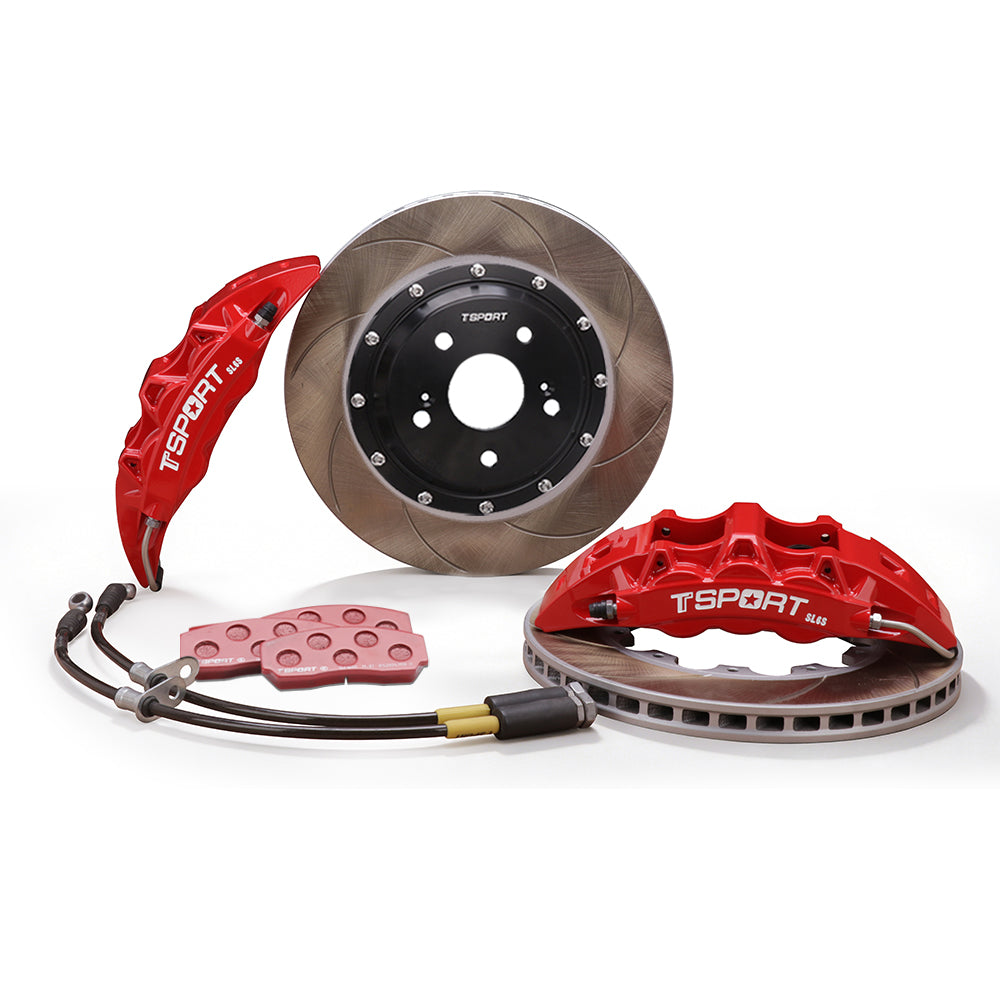
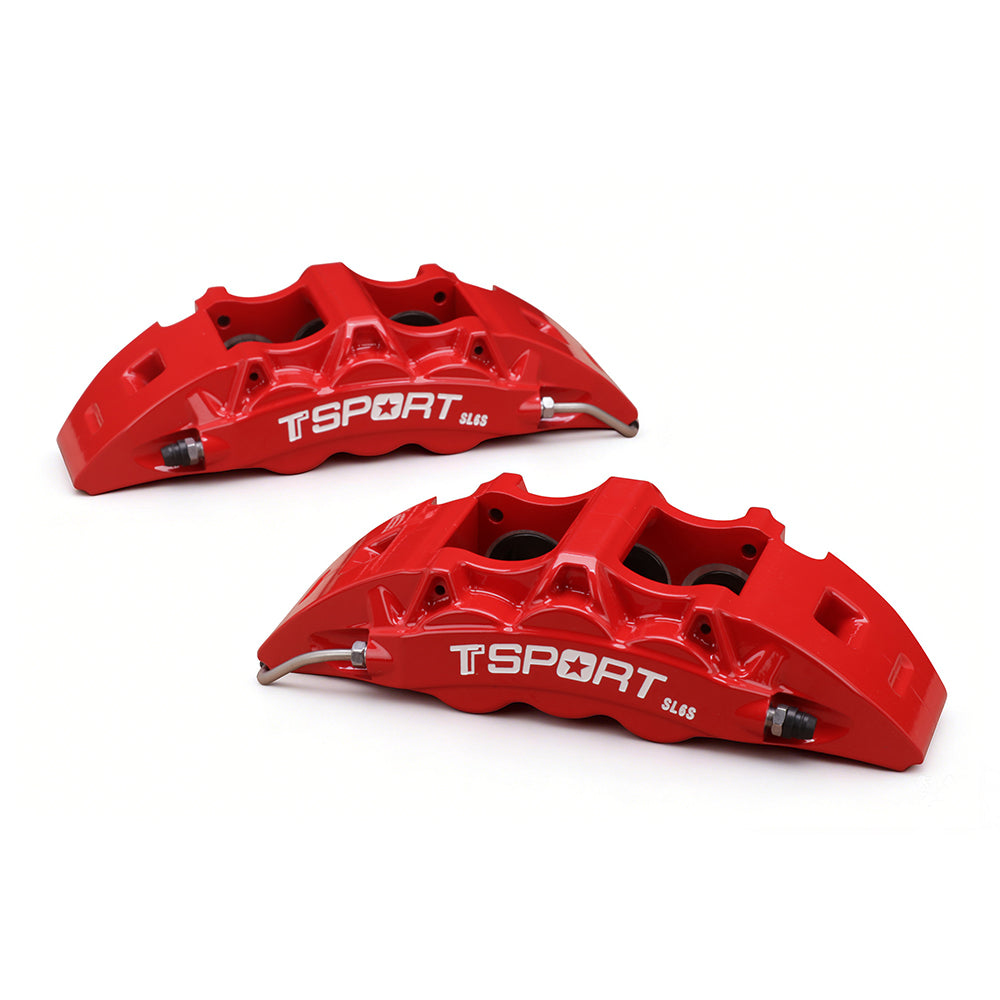
ซีรีส์ Slim · เพลาหน้า · คาลิปเปอร์ 6 สูบ
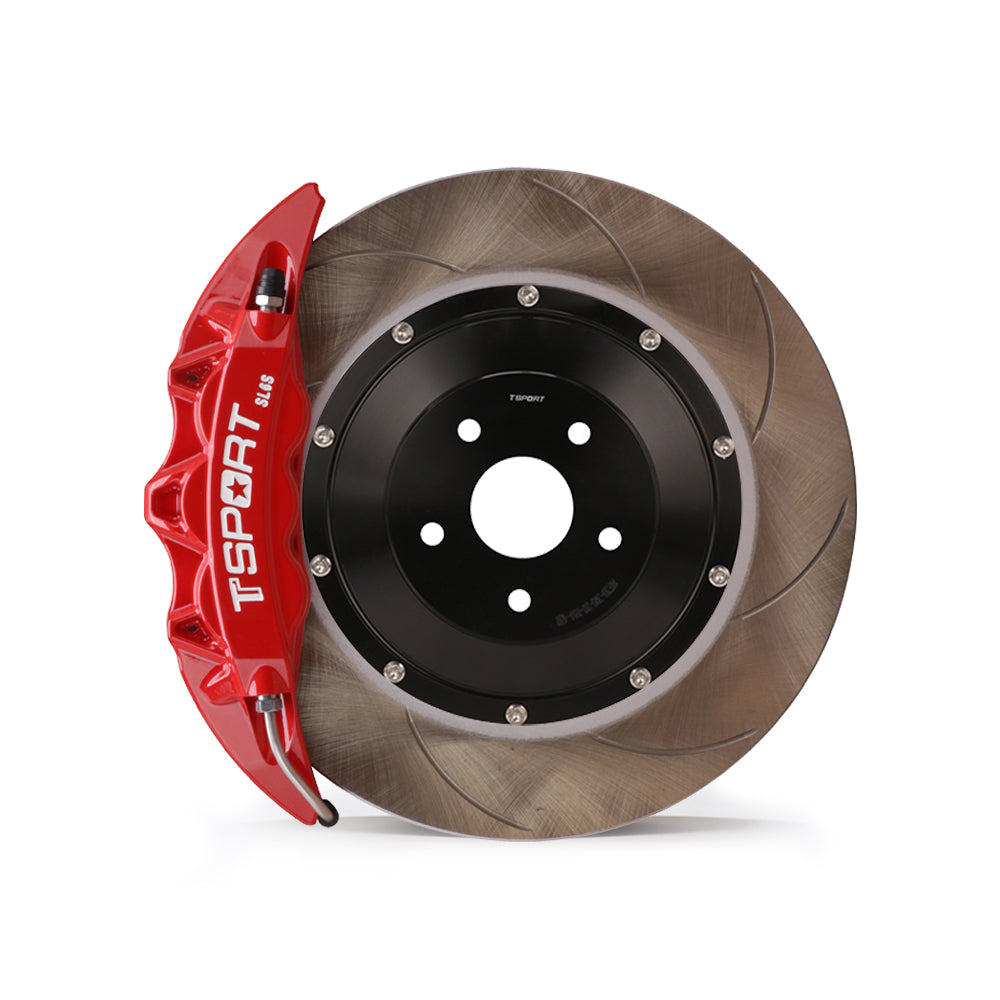
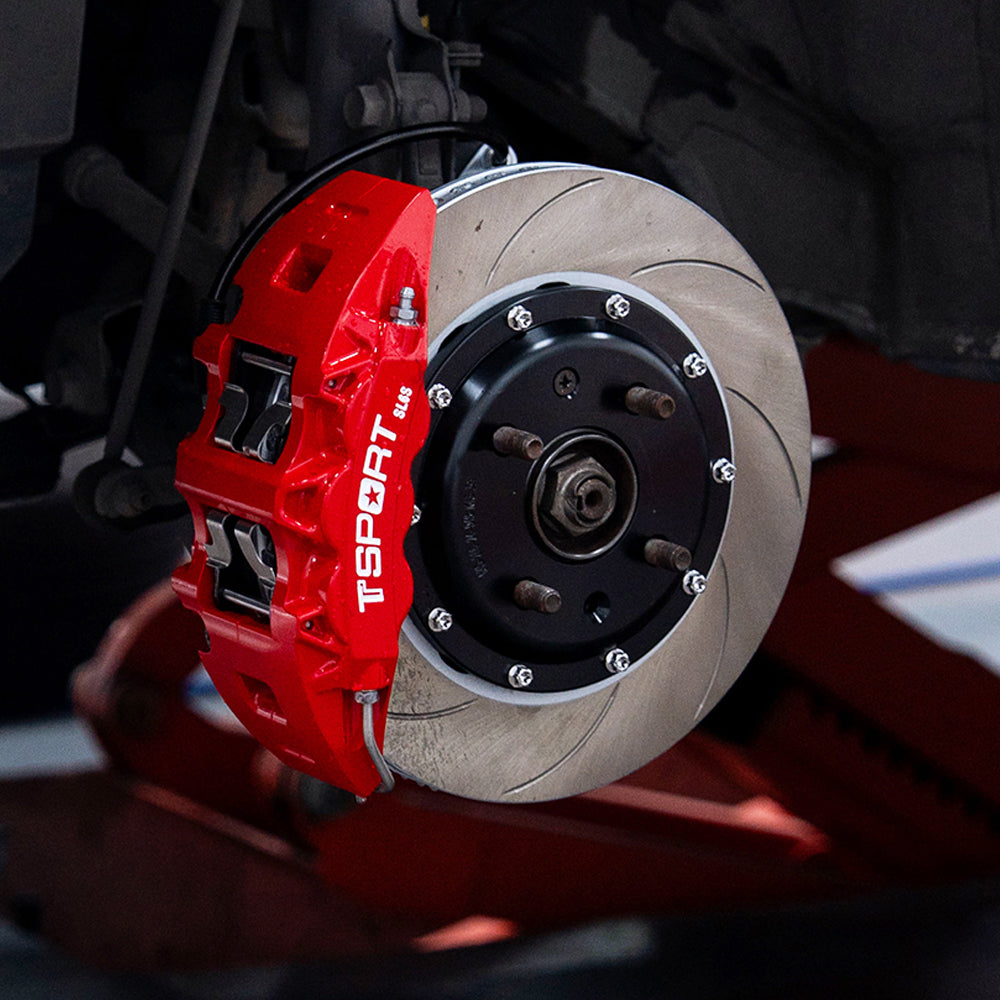
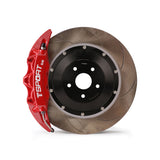
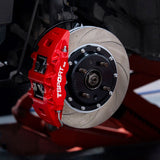
ชุดเบรกหน้า Slim SL6S แบบ 6 สูบที่มีความบางเป็นพิเศษ ออกแบบสำหรับผู้ขับขี่ที่ต้องการแรงหยุดที่แท้จริงสำหรับล้อขนาด 15 นิ้วขึ้นไป คาลิปเปอร์อะลูมิเนียมขึ้นรูป ลูกสูบแบบสเตเกอร์ และโรเตอร์แบบสองชิ้นขนาด 285–295 มม. ให้ความรู้สึกแป้นเบรกแน่น จับได้ดี และสามารถหยุดซ้ำได้ดีทั้งบนถนน คานหิน และในสนามแข่ง
ตัวถังอะลูมิเนียมขึ้นรูปแบบสองชิ้นมีความกว้างเพียง 121.6 มม. และสูง 74.9 มม. ช่วยให้สามารถติดตั้งได้ในดีไซน์ล้อที่มีความแน่นหนา ซึ่งไม่สามารถรองรับคาลิปเปอร์แบบโมโนบล็อกที่ลึกกว่าได้
ลูกสูบขนาด 28 มม., 30 มม., และ 36 มม. (พื้นที่รวม 46.8 ตร.ซม.) ถูกจัดวางด้านหน้าและด้านหลังของแผ่นเบรกเพื่อสมดุลแรงดัน ลดการสึกหรอของการบีบและเพิ่มความแม่นยำในการควบคุมเบรก
ลูกสูบแบบชิ้นเดียวที่มีฉนวนความร้อนและบู๊ทกันฝุ่นชะลอการถ่ายเทความร้อนเข้าสู่ของเหลวเบรก ช่วยรักษาความรู้สึกของแป้นเบรกในระหว่างการหยุดหนักซ้ำๆ
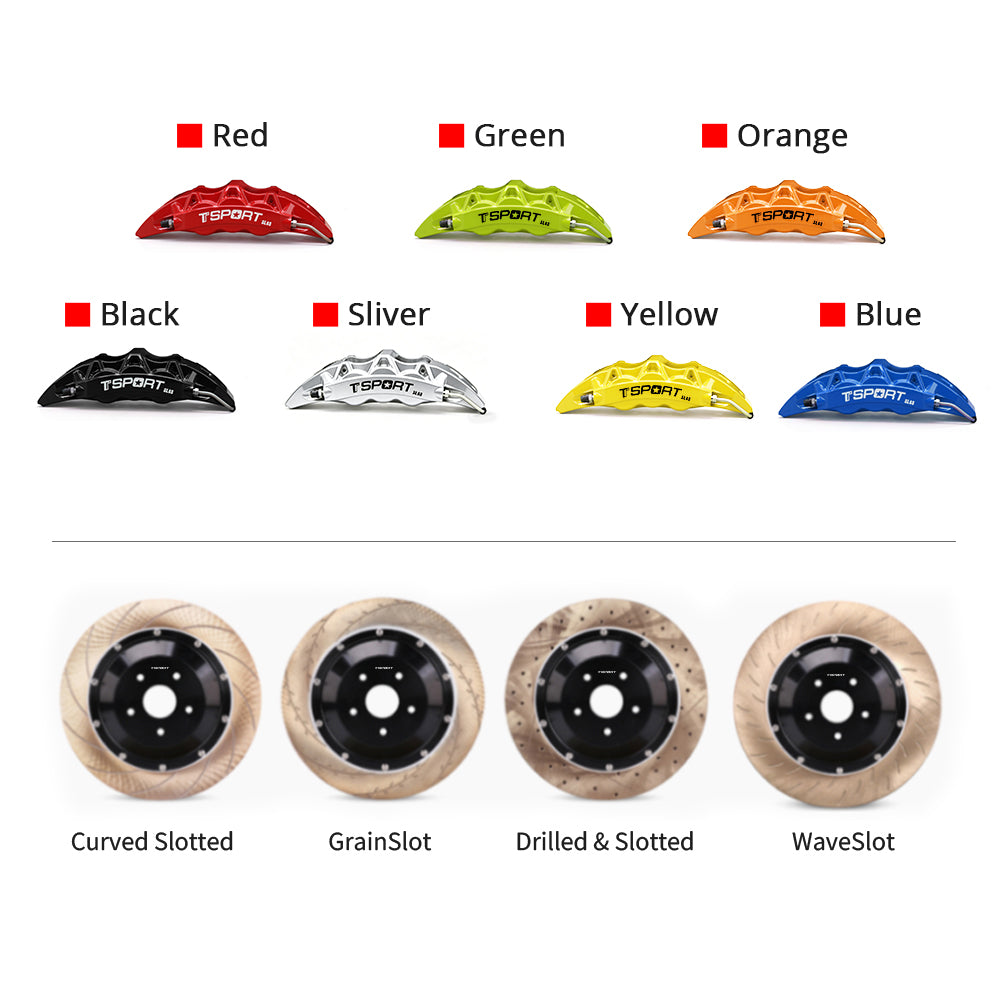
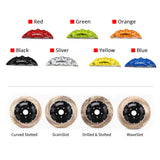
พื้นผิวเหล็กหล่อที่ผ่านการอบความร้อนสูงจากเหล็กกล้าคาร์บอนบนฐานอะลูมิเนียมที่ผ่านการกลึง CNC มีช่องระบายความร้อนภายในแบบระบายอากาศ ทิศทางเดียว ซ้าย/ขวาเฉพาะ พร้อมตัวเลือกพื้นผิวเป็นร่องโค้ง ริ้วรอย เม็ดทราย หรือเจาะและร่อง
| คาลิปเปอร์เบรก | ||
|---|---|---|
| ซีรีส์ | ซีรีส์ Slim | |
| รุ่น / การใช้งาน | SL6S | |
| ตำแหน่งเพลาขับ | ด้านหน้า | |
| จำนวนลูกสูบ | 6-ปืนก้าน | |
| ประเภทลูกสูบ | ลูกสูบกันความร้อนแบบชิ้นเดียว | |
| เส้นผ่านศูนย์กลางลูกสูบ | 28 มม. × 2 / 30 มม. × 2 / 36 มม. × 2 | |
| ขนาดคาลิปเปอร์ | กว้าง 268.5 มม. × ยาว 121.6 มม. × สูง 74.9 มม. | |
| พื้นที่ลูกสูบรวม | พื้นที่รวม 46.8 ตร.ซม. ต่อคาลิปเปอร์ รวมลูกสูบทั้งหมด | |
| กระบวนการผลิต | ตัวถังอะลูมิเนียมขึ้นรูปสองชิ้น | |
| น้ำหนักสุทธิ | น้ำหนัก 1.96 กก. ต่อคาลิปเปอร์ โดยไม่รวมแผ่นเบรก | |
| พื้นผิวเคลือบเงา | เคลือบเงาอุณหภูมิสูง | |
| ขนาดล้อที่แนะนำ | 15 นิ้วขึ้นไปหรือใหญ่กว่า | |
| ขนาดโรเตอร์ที่แนะนำ | Ø285–295 มม. × 28 มม. | |
| ตัวเลือกดิสก์เบรก | ||
| ตัวเลือกโรเตอร์ | โรเตอร์ 285 มม. | โรเตอร์ 295 มม. |
| วัสดุโรเตอร์ | เหล็กหล่อโครเมียมสูงผ่านการอบความร้อน | เหล็กหล่อโครเมียมสูงผ่านการอบความร้อน |
| ตำแหน่งเพลาขับ | ด้านหน้า | ด้านหน้า |
| ขนาดโรเตอร์ | Ø285 มม. × 24 มม. | Ø295 มม. × 24 มม. |
| โครงสร้าง | ชุดโรเตอร์แบบสองชิ้น | ชุดโรเตอร์แบบสองชิ้น |
| การระบายอากาศ | ระบายอากาศภายใน | ระบายอากาศภายใน |
| การติดตั้งโรเตอร์ | แบบคงที่หรือแบบลอย ขึ้นอยู่กับขนาดโรเตอร์และการใช้งานของรถ | แบบคงที่หรือแบบลอย ขึ้นอยู่กับขนาดโรเตอร์และการใช้งานของรถ |
| ดีไซน์ทิศทาง | ใช่ — เฉพาะซ้าย/ขวา | ใช่ — เฉพาะซ้าย/ขวา |
| ลายบนพื้นผิวโรเตอร์ | ร่องโค้ง / ร่องเม็ดทราย / ร่องคลื่น / เจาะและร่อง | ร่องโค้ง / ร่องเม็ดทราย / ร่องคลื่น / เจาะและร่อง |
| ผ้าเบรก | ||
| วัสดุโรเตอร์ที่รองรับได้ | โรเตอร์เหล็ก / เหล็กเท่านั้น | |
| ช่วงอุณหภูมิการทำงาน | 0–600 °C | |
| ค่าเฉลี่ยค่าสัมประสิทธิ์แรงเสียดทาน | μ ≈ 0.38; ขึ้นอยู่กับอุณหภูมิ ความดันของสาย และสภาพของโรเตอร์ | |
| สายเบรก | ||
| โครงสร้างสายเบรก | เสริมแรงสามชั้น | |
| วัสดุสายเบรก | PTFE inner liner / SUS304 stainless-steel braid / PVC outer sheath | |
| หัวต่อสายเบรก | เฉพาะรถแต่ละรุ่น; ฝั่งคาลิปเปอร์และฝั่งแชสซีแตกต่างกันตามการใช้งาน | |
| แร็ค | ||
| กระบวนการผลิตฮาร์ดแวร์ฮาร์ทโรเตอร์ | ผ่านการกลึง CNC | |
| วัสดุฮาร์ทโรเตอร์ | อะลูมิเนียมอัลลอยด์ความแข็งแรงสูง | |
| กระบวนการผลิตแร็คคาลิปเปอร์ | ผ่านการกลึง CNC | |
| วัสดุแร็คคาลิปเปอร์ | เหล็กกล้าคาร์บอน | |
| ประเภทการติดตั้งคาลิปเปอร์ | การติดตั้งแบบรัศมี พร้อม brackets คาลิปเปอร์เฉพาะสำหรับแต่ละรุ่นรถ | |
| การติดตั้งและการปรับเข้ากัน | ||
| ระยะห่างของซี่ล้อขั้นต่ำ | 75 มม. | |
| ขนาดล้อที่แนะนำ | 15 นิ้วขึ้นไปหรือใหญ่กว่า | |
| ขอบเขตของคาลิปเปอร์ | กว้าง 268.5 × ยาว 121.6 × สูง 74.9 มม. | |
| ขอบเขตของโรเตอร์ | Ø285 หรือ Ø295 มม. × 24 มม. | |
| ขั้นตอนการเบรกเบดดิ้ง | จำเป็นต้องตรวจสอบก่อนใช้งานอย่างเข้มงวด | |
ชุดเบรก SL6S รองรับโรเตอร์หน้า Ø285 มม. และ Ø295 มม. ที่หนา 24 มม. ตัวเลือก Ø295 มม. ให้ความสามารถในการรับความร้อนมากขึ้นสำหรับรถที่หนักหรือการหยุดหนักซ้ำๆ ส่วน Ø285 มม. เหมาะสำหรับชุดล้อที่มีความแน่นหนามากขึ้น
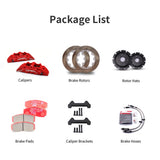
ชุดคาลิปเปอร์หน้า SL6S แบบ 6 สูบ ขึ้นรูป 2 ชุด (ซ้าย/ขวา)
แผ่นเบรกความร้อนสูง 1 ชุด สำหรับคาลิปเปอร์หน้าแต่ละข้าง
โรเตอร์หน้าแบบสองชิ้น Ø285 มม. หรือ Ø295 มม. × 24 มม. พร้อมฐานอะลูมิเนียม CNC 2 ชิ้น
แคลมป์ยึดติดแบบ CNC ทำจากเหล็กคาร์บอน
หมวกโรเตอร์อลูมิเนียม CNC สองชิ้น
สายเบรกถักสแตนเลส 2 ชิ้น พร้อมอุปกรณ์ต่อสายเฉพาะรถ
อุปกรณ์ติดตั้งรวมอยู่แล้ว
ก่อนสั่งซื้อ โปรดยืนยันว่าล้อของคุณมีระยะห่างเพียงพอสำหรับ SL6S ล้อที่มีดีไซน์แน่นอาจต้องใช้ตัวเว้นระยะศูนย์กลาง 3–5 มม. ส่งรูปภาพล้อของคุณมาให้เราดูถ้าคุณไม่แน่ใจ
เส้นผ่าศูนย์กลางล้อย่างน้อย 15 นิ้วขึ้นไป
ระยะห่างระหว่างซี่ล้อขั้นต่ำ 75 มม. จากหน้าแกนกลาง
ชุด SL6S ใช้แคลมป์แบบรัศมีที่ออกแบบเฉพาะสำหรับรถแต่ละรุ่นและอุปกรณ์ต่อสายเบรกที่เหมาะสมกับแต่ละรุ่น ติดต่อเราพร้อมปี ยี่ห้อ รุ่น และรุ่นย่อยของรถของคุณก่อนชำระเงิน เพื่อให้เราส่งชุดแคลมป์และสายเบรกที่ถูกต้อง
ขนาดกล่องแคลมป์: ยาว 268.5 × กว้าง 121.6 × สูง 74.9 มม. ขนาดกล่องโรเตอร์: เส้นผ่าศูนย์กลาง 285 หรือ 295 มม. × ความหนา 24 มม.
ชุดนี้ต้องใช้ล้อขนาด 15 นิ้วขึ้นไป โดยมีระยะห่างระหว่างซี่ล้อและหน้าแกนกลางอย่างน้อย 75 มม. ตัวแคลมป์เองมีขนาด 268.5 × 121.6 × 74.9 มม. หากไม่แน่ใจ ส่งรูปภาพภายในของล้อของคุณมาให้เรายืนยันได้เลย
ชุดเบรก SL6S รองรับโรเตอร์หน้า Ø285 มม. และ Ø295 มม. ที่หนา 24 มม. ตัวเลือก Ø295 มม. ให้ความสามารถในการรับความร้อนมากขึ้นสำหรับรถที่หนักหรือการหยุดหนักซ้ำๆ ส่วน Ø285 มม. เหมาะสำหรับชุดล้อที่มีความแน่นหนามากขึ้น
การจัดวางลูกสูบ 28 / 30 / 36 มม. จะทำให้บอร์สบนผ้าเบรกมีความสมดุลกันระหว่างด้านหน้าและด้านหลังของผ้าเบรก ทำให้การสวมใส่ของผ้าเบรกเป็นไปอย่างสม่ำเสมอและการควบคุมแรงเบรกมีความแม่นยำมากขึ้นเมื่อเทียบกับแบบ 6 ลูกสูบที่มีขนาดเท่ากัน
ใช่ แผ่นเบรกที่รวมอยู่มีช่วงอุณหภูการทำงาน 0–600 °C และค่าเฉลี่ย μ อยู่ที่ 0.38 จึงสามารถกัดจับได้ดีในสภาพอากาศเย็นสำหรับการขับขี่ประจำวัน และยังคงเสถียรในระหว่างการขับสนุกในหุบเขาหรือวันแข่งสนาม
ใช่ ชุด SL6S ใช้แคลมป์แบบรัศมีที่ออกแบบเฉพาะสำหรับแต่ละรถและอุปกรณ์ต่อสายเบรกที่เหมาะสมกับแต่ละรุ่น ติดต่อเราพร้อมปี ยี่ห้อ รุ่น และรุ่นย่อยของรถของคุณก่อนชำระเงิน เพื่อให้เราส่งชุดแคลมป์และสายเบรกที่ถูกต้อง
ชุด SL6S ถูกออกแบบเป็นชุดสำหรับล้อหน้าเท่านั้น เพื่อความสมดุลในการอัปเกรด ควรจับคู่กับชุดหลัง TTSPORT ที่เข้ากันได้ เพื่อให้แรงเบรกสมดุลกันอย่างถูกต้อง
ทีมงานของเรายืนยันความเข้ากันได้ของล้อ, สเปคของแคลมป์ และการวางสายเบรกก่อนที่คำสั่งซื้อจะถูกจัดส่ง ไปดูการติดตั้งจริงของลูกค้าหรือพูดคุยกับผู้เชี่ยวชาญด้านเบรกได้เลย
Brake Kits · Fitment · Installation · Care Guide
A brake kit is not just a pair of larger calipers. Calipers, rotors, pads, hoses, brackets, rotor hats, mounting hardware, brake fluid, wheel clearance, and bedding procedure all work together as one system.
This guide explains how to confirm the right TTSPORT brake kit before ordering, what to check before installation, and how to care for the system after installation.
Do not order a brake kit by vehicle name alone. The correct kit depends on the vehicle, axle position, wheel package, driving use, and brake system layout.
Brake kits are application-specific. A visually similar kit can still have the wrong rotor offset, bracket geometry, hose fitting, caliper position, or wheel clearance requirement.
Different TTSPORT brake kit series use different hardware layouts. Always confirm what the kit includes before purchase.
Use direct-mount calipers and one-piece rotors where specified. These kits do not use rotor hats or caliper brackets unless the final product page clearly states otherwise.
Use separate friction rings and rotor hats. Hat offset, ring bolt pattern, hardware style, and rotor direction must be matched correctly.
May require bespoke brackets, rotor hats, brake lines, and engineering confirmation based on knuckle, hub, wheel, and competition use.
Require extra attention to wheel clearance, tire size, vehicle load, descent control, hose routing, and dust / water exposure.
Do not assume every brake kit includes the same parts. Package contents vary by product series, vehicle application, and final order configuration.
Before finalizing the order, review the kit specification carefully. Confirm the brake kit is matched to your vehicle and wheel setup, not only to the model name.
If any part is not listed in the final order or product page, do not assume it is included.
Inspect every component before installation. Do not modify, grind, drill, stretch, force, or space brake kit components to make them fit.
Safety: Brake kits affect braking force, hydraulic sealing, heat control, wheel clearance, and vehicle stability. Do not install the kit if fitment, torque, direction, clearance, or compatibility is unclear.
Correct installation is as important as the brake kit itself. A properly engineered kit can still perform poorly if installed with dirty mounting faces, incorrect torque, poor hose routing, or trapped air in the hydraulic system.
Verify caliper centering over the rotor and confirm even pad sweep across the friction surface.
Confirm left / right rotor direction if the rotor uses directional vanes or directional face pattern.
Check brake hose length and routing at full steering lock and full suspension travel. No twisting, rubbing, stretching, or kinking.
Check caliper-to-spoke and caliper-to-barrel clearance before road use. Wheel diameter alone is not enough.
Use the correct brake fluid type and bleed the system until pedal feel is firm and consistent.
Torque all brake hardware to the specified value. Do not reuse damaged, unknown, stretched, or corroded safety-critical fasteners.
Brake pads and rotors need a controlled bedding process before full performance is available. Bedding helps create an even transfer layer on the rotor surface, improving bite, pedal consistency, and vibration resistance.
Street pads, race pads, iron rotors, two-piece rotors, and carbon ceramic rotors may require different bedding procedures. Use the procedure supplied with the specific kit.
After installation and bedding, give the system a short break-in period before aggressive use. Pedal feel, pad contact, dust output, and noise may continue to settle after the first drives.
Brake kits need regular inspection, especially after track use, off-road use, towing, mountain driving, winter salt exposure, or any brake service.
Inspect pads, rotors, fluid level, and hose condition during normal service intervals. Prioritize quiet operation, smooth pedal feel, and even wear.
Check pad thickness, rotor surface condition, and fluid condition more often. Long descents create sustained heat even without track use.
Inspect for mud, sand, stone impact, hose abrasion, dust boot damage, and caliper contamination after trail use.
Inspect pads, rotors, fluid, and hardware before and after every event. Track heat shortens service intervals.
Check rear brake temperature, hydraulic handbrake behavior, pad wear, rotor cracking, and hardware condition frequently.
Use only compatible pads and approved bedding procedures. Inspect rotor surface condition carefully and avoid incompatible friction materials.
Do not continue driving if the brake system shows any of the following symptoms. Inspect the system or contact a qualified brake technician before using the vehicle again.
Send your vehicle details, brake kit series, wheel specs, driving use, photos, and any symptoms you notice. TTSPORT will help confirm fitment, installation checks, and the correct care path for your brake kit.
ขอบคุณสำหรับการสมัครสมาชิก!
อีเมลนี้ได้รับการลงทะเบียนแล้ว!