


장거리 내리막길용 열용량
적용에 적합한 Ø345 mm × 32 mm 통풍식 로터와 캘리퍼당 79 cm²의 피스톤 면적이 경사를 오를 때도 페달 감각을 유지하는 데 도움을 줍니다.
이메일: sales@ttsport-racing.com
통화
 AED
AED
 AFN
AFN
 ALL
ALL
 AMD
AMD
 ANG
ANG
 AUD
AUD
 AWG
AWG
 AZN
AZN
 BAM
BAM
 BBD
BBD
 BDT
BDT
 BIF
BIF
 BND
BND
 BOB
BOB
 BSD
BSD
 BWP
BWP
 BZD
BZD
 CAD
CAD
 CDF
CDF
 CHF
CHF
 CNY
CNY
 CRC
CRC
 CVE
CVE
 CZK
CZK
 DJF
DJF
 DKK
DKK
 DOP
DOP
 DZD
DZD
 EGP
EGP
 ETB
ETB
 EUR
EUR
 FJD
FJD
 FKP
FKP
 GBP
GBP
 GMD
GMD
 GNF
GNF
 GTQ
GTQ
 GYD
GYD
 HKD
HKD
 HNL
HNL
 HUF
HUF
 IDR
IDR
 ILS
ILS
 INR
INR
 ISK
ISK
 JMD
JMD
 JPY
JPY
 KES
KES
 KGS
KGS
 KHR
KHR
 KMF
KMF
 KRW
KRW
 KYD
KYD
 KZT
KZT
 LAK
LAK
 LBP
LBP
 LKR
LKR
 MAD
MAD
 MDL
MDL
 MKD
MKD
 MMK
MMK
 MNT
MNT
 MOP
MOP
 MUR
MUR
 MVR
MVR
 MWK
MWK
 MYR
MYR
 NGN
NGN
 NIO
NIO
 NPR
NPR
 NZD
NZD
 PEN
PEN
 PGK
PGK
 PHP
PHP
 PKR
PKR
 PLN
PLN
 PYG
PYG
 QAR
QAR
 RON
RON
 RSD
RSD
 RWF
RWF
 SAR
SAR
 SBD
SBD
 SEK
SEK
 SGD
SGD
 SHP
SHP
 SLL
SLL
 STD
STD
 THB
THB
 TJS
TJS
 TOP
TOP
 TTD
TTD
 TWD
TWD
 TZS
TZS
 UAH
UAH
 UGX
UGX
 USD
USD
 UYU
UYU
 UZS
UZS
 VND
VND
 VUV
VUV
 WST
WST
 XAF
XAF
 XCD
XOF
XPF
XCD
XOF
XPF
 YER
YER
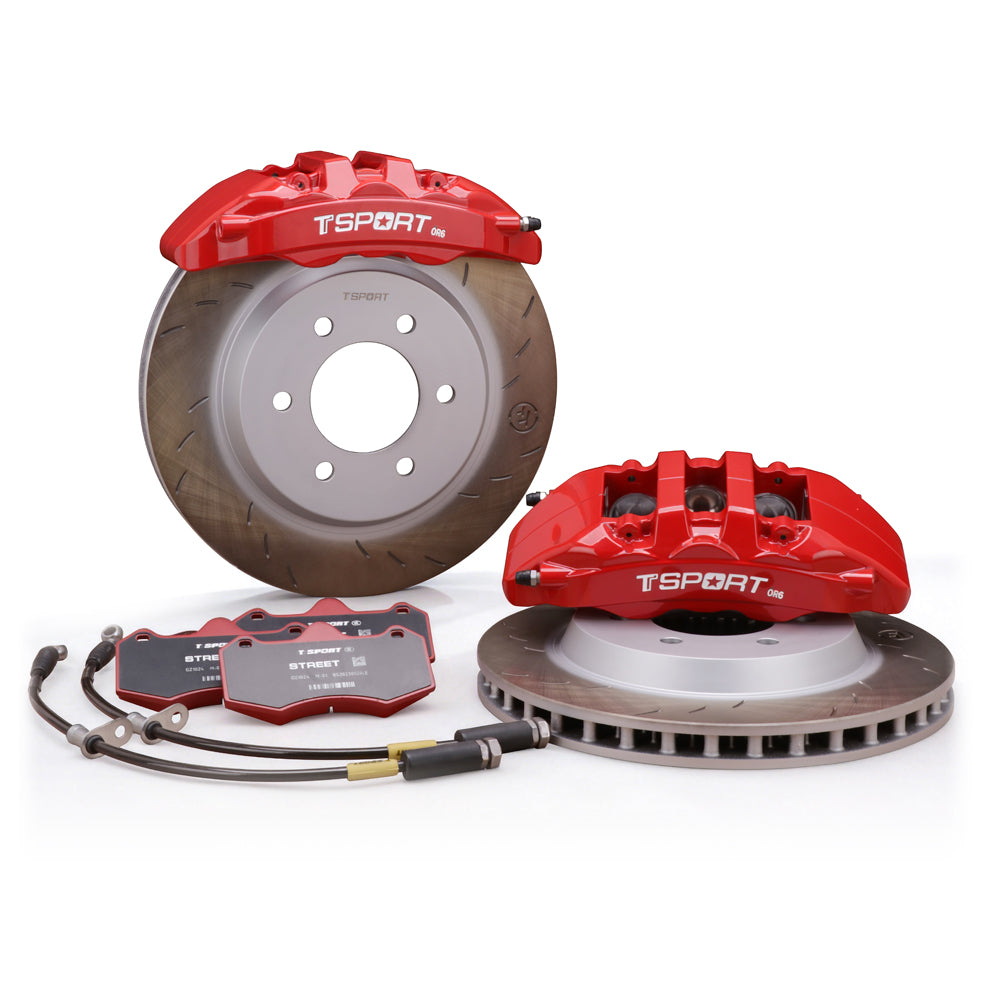
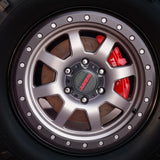
직접 장착 시리즈 · 전면 액슬 · 오프로드 6피스톤
TTSPORT OR6 전면 대형 브레이크 키트는 토요타 LC150 프라도 및 렉서스 GX400/GX460 오너들이 무거운 장비를 운반할 때 적합합니다. 방탄, 윈치, 서랍, 장거리 연료탱크, 루프 텐트, 더 큰 타이어, 트레일러 적재 모두 전면 브레이크에 더 많은 부담을 줍니다 — 특히 긴 산악 내리막길과 거친 트레일에서 열 제어와 페달 일관성이 결과를 좌우합니다.
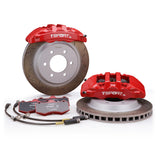
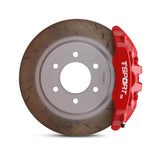
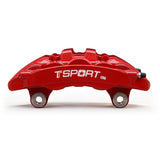
OR6는 단조 6피스톤 전면 캘리퍼와 Ø345 mm × 32 mm 열처리된 고탄소 주철 로터, 매치된 패드, 스테인리스 스틸 브레이드 라인을 조합합니다. 이는 더 높은 열 용량, 더 단단한 페달 감, 그리고 실제 오버랜드 하중에서 예측 가능한 조절력을 제공합니다 — 거칠거나 트랙 전용의 강한 물림이 아닌, 제어하기 쉬운 성능입니다.
적용에 적합한 Ø345 mm × 32 mm 통풍식 로터와 캘리퍼당 79 cm²의 피스톤 면적이 경사를 오를 때도 페달 감각을 유지하는 데 도움을 줍니다.
평균 μ 0.38의 0–600°C 등급의 패드 화합물 — 와시보드, 바위, 느린 기술 구간에서 제어를 위해 설계되었으며, 단거리 스프린트용이 아닙니다.
강철 범퍼, 윈치, 서랍, 연료, 물, 회수 장비, 더 큰 타이어를 실은 트럭용으로 설계됨.
SUS304 스테인리스 브레이드 PTFE 라인은 트럭이 적재되거나 뜨겁거나 내리막 작업 시 호스 확장을 줄여줍니다.
캘리퍼는 차량별 전용 프론트 너클 기하학에 직접 장착됩니다 — 이 OR6 구성에는 로터 햇이나 캘리퍼 브래킷이 사용되지 않습니다.
Toyota Land Cruiser Prado (LC150), Lexus GX400, Lexus GX460는 OR6 Ø345 mm × 32 mm 전면 로터 사양을 사용합니다.
| 브레이크 캘리퍼 | |
|---|---|
| 시리즈 | 직장착 시리즈 |
| 모델 / 적용 대상 | OR6 |
| 액슬 위치 | 앞면 |
| 피스톤 수 | 6피스톤 |
| 피스톤 유형 | 먼지 방지 장치가 있는 일체형 열 차단 피스톤 |
| 피스톤 직경 | 40 mm × 4 / 43 mm × 2 |
| 캘리퍼 치수 | L 301 mm × W 149 mm × H 130 mm |
| 총 피스톤 면적 | 캘리퍼당 79cm², 모든 피스톤을 합산한 면적 |
| 제조 공정 | 이중 단조 알루미늄 바디 |
| 순중량 | 캘리퍼당 4kg, 패드 제외 |
| 표면 마감 | 고온 광택 코팅 |
| 권장 휠 크기 | 17인치 이상 |
| 권장 로터 크기 | Ø340–355 mm × 32/34 mm |
| 브레이크 로터 | |
| 디스크 재질 | 열처리된 고탄소 주철 |
| 액슬 위치 | 앞면 |
| 이 용도에 맞는 로터 크기 | Ø345 mm × 32 mm |
| 구성 | 일체형 로터 |
| 환기 | 내부 환기형 |
| 로터 장착 방식 | 고정식 |
| 방향성 설계 | 예 — 좌우 구분 |
| 로터 표면 패턴 | 웨이브 슬롯 |
| 제동 패드 | |
| 호환 로터 재질 | 철 / 강재 로터만 해당 |
| 작동 온도 범위 | 0–600 °C |
| 평균 마찰 계수 | 평균 μ: 0.38; 온도, 라인 압력, 로터 상태에 따라 차이 있음 |
| 라인 | |
| 브레이크 라인 구조 | 3중 강화 구조 |
| 브레이크 라인 재질 | PTFE 내부 라이너 / SUS304 스테인리스 강선 / PVC 보호 외피 |
| 브레이크 라인 피팅 | 차량별 피팅; 캘리퍼 측 및 차체 측 피팅은 적용에 따라 다름 |
| 차량 적용 및 로터 매핑 | |
| 2009-2023 토요타 랜드크루저 프라도 (LC150) | 345 mm × 32 mm |
| 2012-2017 렉서스 GX400 | 345 mm × 32 mm |
| 2010-2023 렉서스 GX460 | 345 mm × 32 mm |
| 적합성 및 설치 | |
| 차량 적용 | 2009-2023 토요타 랜드크루저 프라도 (LC150) · 2012-2017 렉서스 GX400 · 2010-2023 렉서스 GX460 |
| 모델 연도 | Toyota Land Cruiser Prado LC150: 2009-2023 · Lexus GX400: 2012-2017 · Lexus GX460: 2010-2023 |
| 액슬 | 앞면 |
| 캘리퍼 장착 유형 | 직장착 |
| 최소 휠 크기 | 17인치 이상 |
| 최소 스포크 간격 | 91 mm |
| 브레이크 라인 피팅 유형 | 차량별 피팅; 캘리퍼 측 및 차체 측 피팅은 적용에 따라 다름 |
| 베딩 인 절차 | 필수 |
2009-2023년 Toyota Land Cruiser Prado (LC150), 2012-2017년 Lexus GX400, 2010-2023년 Lexus GX460의 경우, 올바른 OR6 로터 사양은 Ø345 mm × 32 mm입니다. 이 애플리케이션에 대해 구형 335 / 345 / 355 mm 옵션 레이아웃은 사용하지 마십시오.
좌우별로 특화된 2개 OR6 단조 6피스톤 전면 캘리퍼
양쪽 프론트 캘리퍼용 브레이크 패드, 0–600 °C 등급, 철 / 강철 로터용.
2개 일체형 전면 로터, Ø345 mm × 32 mm, 열처리된 고탄소 주철, 내부 배기구, 좌우 전용 설계.
스테인리스 스틸 브레이드 브레이크 라인 2개, PTFE 내부 라이너, SUS304 브레이드, PVC 보호 외피, 차량별 피팅 포함.
토요타 LC150 프라도 / 렉서스 GX400 / GX460 전면 차축 설치용 차량별 직장 장착 하드웨어.
Direct-Mount 시리즈는 일체형 로터와 직장 마운트 캘리퍼를 사용합니다. 로터 햇과 캘리퍼 브래킷은 이 적용에 포함되지 않으며 사용되지 않습니다.
OR6는 최소 91 mm의 스포크 클리어런스가 있는 17인치 이상 휠이 필요합니다. 휠 직경만으로는 충분하지 않으며, 스포크 모양, 배럴 프로파일, 오프셋 모두 적합성에 영향을 미칩니다.
17인치 이상 휠이 필요합니다.
최소 스포크 클리어런스: 91 mm. 주문 전에 스포크 모양, 휠 오프셋, 내부 배럴 프로파일을 확인하세요.
적용 대상: 2009-2023년 Toyota Land Cruiser Prado (LC150), 2012-2017년 Lexus GX400, 2010-2023년 Lexus GX460, 전면 축, Ø345 mm × 32 mm 로터 사양.
클리어런스에 대해 확실하지 않은 경우, 주문 전에 모델 연도, 트림, 휠 사양, 용도를 보내주세요.
네. 이 목록은 2009-2023년 Toyota Land Cruiser Prado (LC150), 2012-2017년 Lexus GX400, 2010-2023년 Lexus GX460의 전면 축 6피스톤 업그레이드를 포함합니다. 이 적용에 적합한 로터 사양은 Ø345 mm × 32 mm입니다.
2009-2023년 Toyota Land Cruiser Prado (LC150), 2012-2017년 Lexus GX400, 2010-2023년 Lexus GX460는 OR6 직장착 시리즈의 Ø345 mm × 32 mm 일체형 전면 로터를 사용합니다. 구형 335 / 345 / 355 mm 옵션 레이아웃은 사용하지 마십시오.
OR6는 17인치 이상 휠과 최소 스포크 간격 91mm 이상이 필요합니다. 휠 직경만으로는 충분하지 않으며, 스포크 프로파일, 오프셋, 배럴 모양을 주문 전에 반드시 확인해야 합니다.
아니요. 이 제품은 일체형 로터와 직장 마운트 캘리퍼를 사용하는 OR6 Direct-Mount 시리즈입니다. 로터 햇과 캘리퍼 브래킷은 이 구성에 사용되지 않습니다.
OR6는 지속적인 하중 하에서의 제어를 위해 조율되었습니다 — 긴 내리막, 자갈길, 느린 기술적 작업 — 0~600°C 패드와 평균 μ 0.38을 사용합니다. 트랙용 BBK는 짧고 매우 높은 온도에서 정지하는 데 적합하며, 잡기 어렵거나 조절이 어려울 수 있습니다.
네. 각 키트에는 SUS304 스테인리스 브레이드 전면 라인 2개, OR6 패드, 일체형 방향성 로터, 캘리퍼, 직장 마운트 하드웨어가 포함됩니다.
네. 적절한 베딩 절차를 통해 패드 재질이 로터 표면에 균일하게 전달되고, 완전한 마찰력을 발휘할 수 있도록 해야 합니다. 이 과정을 생략하면 불균일한 침착물, 진동, 제동력 저하가 발생할 수 있습니다.
적합성 확인 또는 LC150 프라도 / GX400 / GX460 빌드에 대한 OR6 호환성 확인 도움 필요하신가요?
Brake Kits · Fitment · Installation · Care Guide
A brake kit is not just a pair of larger calipers. Calipers, rotors, pads, hoses, brackets, rotor hats, mounting hardware, brake fluid, wheel clearance, and bedding procedure all work together as one system.
This guide explains how to confirm the right TTSPORT brake kit before ordering, what to check before installation, and how to care for the system after installation.
Do not order a brake kit by vehicle name alone. The correct kit depends on the vehicle, axle position, wheel package, driving use, and brake system layout.
Brake kits are application-specific. A visually similar kit can still have the wrong rotor offset, bracket geometry, hose fitting, caliper position, or wheel clearance requirement.
Different TTSPORT brake kit series use different hardware layouts. Always confirm what the kit includes before purchase.
Use direct-mount calipers and one-piece rotors where specified. These kits do not use rotor hats or caliper brackets unless the final product page clearly states otherwise.
Use separate friction rings and rotor hats. Hat offset, ring bolt pattern, hardware style, and rotor direction must be matched correctly.
May require bespoke brackets, rotor hats, brake lines, and engineering confirmation based on knuckle, hub, wheel, and competition use.
Require extra attention to wheel clearance, tire size, vehicle load, descent control, hose routing, and dust / water exposure.
Do not assume every brake kit includes the same parts. Package contents vary by product series, vehicle application, and final order configuration.
Before finalizing the order, review the kit specification carefully. Confirm the brake kit is matched to your vehicle and wheel setup, not only to the model name.
If any part is not listed in the final order or product page, do not assume it is included.
Inspect every component before installation. Do not modify, grind, drill, stretch, force, or space brake kit components to make them fit.
Safety: Brake kits affect braking force, hydraulic sealing, heat control, wheel clearance, and vehicle stability. Do not install the kit if fitment, torque, direction, clearance, or compatibility is unclear.
Correct installation is as important as the brake kit itself. A properly engineered kit can still perform poorly if installed with dirty mounting faces, incorrect torque, poor hose routing, or trapped air in the hydraulic system.
Verify caliper centering over the rotor and confirm even pad sweep across the friction surface.
Confirm left / right rotor direction if the rotor uses directional vanes or directional face pattern.
Check brake hose length and routing at full steering lock and full suspension travel. No twisting, rubbing, stretching, or kinking.
Check caliper-to-spoke and caliper-to-barrel clearance before road use. Wheel diameter alone is not enough.
Use the correct brake fluid type and bleed the system until pedal feel is firm and consistent.
Torque all brake hardware to the specified value. Do not reuse damaged, unknown, stretched, or corroded safety-critical fasteners.
Brake pads and rotors need a controlled bedding process before full performance is available. Bedding helps create an even transfer layer on the rotor surface, improving bite, pedal consistency, and vibration resistance.
Street pads, race pads, iron rotors, two-piece rotors, and carbon ceramic rotors may require different bedding procedures. Use the procedure supplied with the specific kit.
After installation and bedding, give the system a short break-in period before aggressive use. Pedal feel, pad contact, dust output, and noise may continue to settle after the first drives.
Brake kits need regular inspection, especially after track use, off-road use, towing, mountain driving, winter salt exposure, or any brake service.
Inspect pads, rotors, fluid level, and hose condition during normal service intervals. Prioritize quiet operation, smooth pedal feel, and even wear.
Check pad thickness, rotor surface condition, and fluid condition more often. Long descents create sustained heat even without track use.
Inspect for mud, sand, stone impact, hose abrasion, dust boot damage, and caliper contamination after trail use.
Inspect pads, rotors, fluid, and hardware before and after every event. Track heat shortens service intervals.
Check rear brake temperature, hydraulic handbrake behavior, pad wear, rotor cracking, and hardware condition frequently.
Use only compatible pads and approved bedding procedures. Inspect rotor surface condition carefully and avoid incompatible friction materials.
Do not continue driving if the brake system shows any of the following symptoms. Inspect the system or contact a qualified brake technician before using the vehicle again.
Send your vehicle details, brake kit series, wheel specs, driving use, photos, and any symptoms you notice. TTSPORT will help confirm fitment, installation checks, and the correct care path for your brake kit.
구독해 주셔서 감사합니다!
이 이메일은 등록되었습니다!